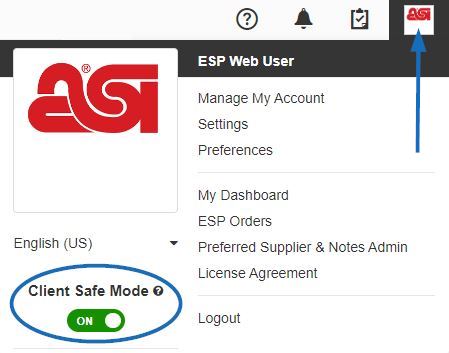
The Account and Applications Area enables you to update your ESP user account information, apply Client Safe Mode, set preferences, show ESP in a different language, logout, and more! To get started, click on the user icon, also known as the Avatar, in the upper right corner.

What would you like to do in the Account and Applications area?
Add an Avatar
To upload an avatar, click on the avatar square to open the Account and Applications area.
Hover on the photo box and then click on the "Change Photo" option.
![]()
Select whether you like to have no image, use Gravatar or upload an image from your computer. To upload an image from your computer, click on radio button below "My Own". If you have previously uploaded an image using the My Own, click on the Upload button in the middle of the image preview to browse for a new image.
Click on the Browse button to locate the image on your computer. Select your image and then click on Open.
The User Image Selection window will display. Click on the Crop button and then use the Zoom to adjust your image.
![]()
Click on Save.
You will see a preview in the User Image Selection window. Make sure you've selected "My Own" and then click on Save.
![]()
Use Language Options
ESP provides users with the option to use the application in Spanish or French. To change the language, click on the avatar icon and then use the dropdown below the image to select the language you would like to use.

Note: The product data will remain in English.
Apply Client Safe Mode
If you would like to use your ESP Web in front of a customer, you are able to switch into Client Safe Mode at any time.
Click on your avatar and then click on the slider below “Client Safe Mode”. All supplier information and net cost information will be hidden immediately. You are still able to add products to the clipboard, product compare, projects and create presentations with Client Safe Mode turned on.

Client Safe Mode can be turned off at any time by clicking on the slider below the avatar. .
Manage My Account
The Manage My Account section enables you to edit your user account for ESP. In this section, you can update your user information, main address, bill to and ship to addresses. You can also update your login information, including changing username, password, and security question for ESP.
Note: Updating your username and password in this section will also update your login information for ASI Central and ASI Education.
Establish Settings
The Settings option will open the ESP Admin area and the sections available in the ESP Admin will vary depending on the administrative rights of your ESP Account. All users will have the Import capability which enables users to import customer data into CRM. Company Administrators will have access to all options of the ESP Admin. If you are not an administrator for ESP but would like to be, please have the primary on your ESP Account contact ASI Technical Product Support at (800) 546-1350, prompt 2 or email support@asicentral.com.
Set ESP Preferences
View
The View tab lets you select to show the net cost, price code or supplier information by checking the corresponding checkbox or uncheck to hide this information. You can also select to open the Product Detail view in a new tab. Lastly, you can use this section to select the default market for searching. Selecting "ALL" will ensure that when you are doing a search for products, suppliers, or decorators, the results will include both those within the US and Canadian markets.
Click on Save when you have made your selections.

Send Product Detail
In the Send Product Detail tab, you can choose whether you would like to include your company logo when sending the product detail page. Check the box to include the logo.
Note: Company logos will need to be uploaded by the company administrator. Administrators will have a link to upload the logo in this section. The link will open the Licenses & Users Admin area where the logo can be uploaded.
Click on Save when you have made your selection.

Virtual Samples
Virtual Samples is where we can choose the default image for the product's detail view for virtual sample-ready products. We can select from the supplier's original image, which is the image the supplier provided to ASI, or we can have a logo or show text on any virtual sample-enabled product.
Click the radio button for "Virtual Sample ready image with Logo from my Library", then click the "Upload a Logo" link. It is important to check the "Remove background color" checkbox first before uploading.
Note: Virtual Samples will only display in the Details View.
Click on Save when you have made your selection.

Product Compare
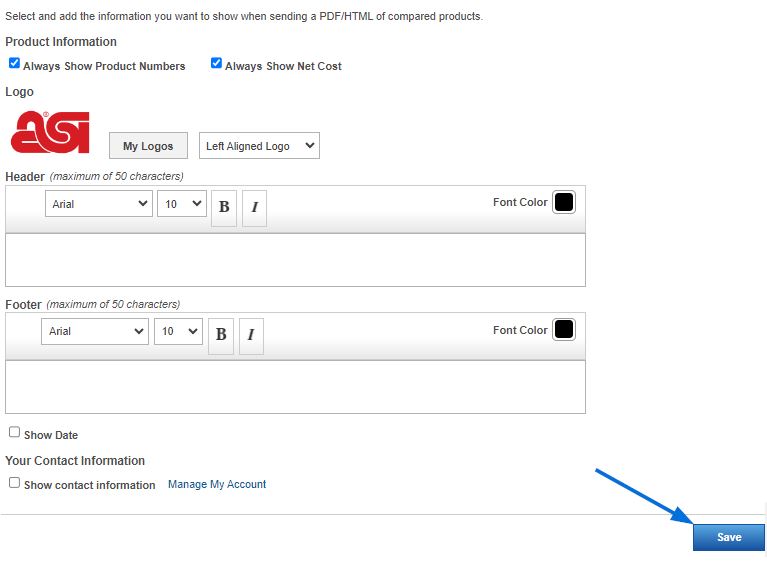
Product Compare is where you can enable options for the PDFs of compared products. You can check the "Always Show Product Numbers" and the "Always Show Net Cost" checkboxes to display the information.
You are also able to upload a logo using the "My Logos" button and then align it using the options in dropdown. You can type information into the Header and Footer sections, as well as check the "Show Date" box and the "Show contact information" box.
Note: Click on the Manage My Account link to update your contact information.
Scroll to the bottom and click on the Save button when you are finished making changes.

Access Additional Applications Links (if applicable)
My Dashboard
The My Dashboard section provides quick access to your available applications.
Preferred Suppliers & Notes Admin
The Preferred Suppliers and Notes Admin area enables you to create and apply Preferred Supplier Lists in ESP Web for your entire company. Please note, in order to be a Preferred Supplier Administrator, you will need a specific license. To become a company administrator, you will need the primary contact at your organization contact ASI Product Support.
License Agreement
Access the License Agreement for ESP. If you would like to print a hard copy of this agreement, scroll to the bottom and click on the Print button.
Logout
Click Logout to sign out of ESP Web.


